Still Board: Basing Puppet Wars Part 2
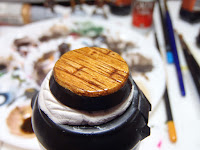
Over the last couple of weeks, I’ve been experimenting with my Puppet War bases to finalize the technique I’m going to be using from here on out. The resulting look above is exactly what I wanted to achieve with their bases; a dramatic ‘game-piece’ look and a good looking finish that matches both the style in which I’m painting the puppets and the board on which they will play. So I thought I’d share some of what I’ve learned with this basing technique.
The process has remained unchanged from my last post. My attention, instead, has been focused on trying to come up with the right combination of inks, washes, paints and varnishes to make the bases look just right. With the first batch done, I am increasingly excited to see all the puppets painted and on the table.
Staining the Bases
Rather than actually painting the wood bases, I wanted to let the grain of the Balsa wood do all the hard work for me, which meant sticking to a scheme of staining the wood either with inks or washes. Right off the bat there are a couple things I noticed with this technique that are worth pointing out.
- Washes have to be applied liberally, at least to the balsa wood as it is very porous and will soak up a great deal of the stain you lay down. When it comes to inks, I’ve steered largely away from them, as they almost darken the wood too extremely.
- Not unlike staining wood furniture, you have to apply the wash evenly or you will see streaking in your wood. This may not be a big deal for Puppet Wars, as I’m going for a musty feel of an old shack. For other bases, like Collette and her showgirls, for example, I’d want to pay closer attention to an even coat for a nicer looking floor.
- Like all painting, adding a varnish is a crucial step. While I am guilty of not applying varnish to many models, I’ve found that for these bases, it is absolutely necessary to get the look I’m after.
 Next up I decided to try a darker tone, mixing Sepia Wash with a very thinned down Scorched Earth. As I said before, it is important to thin the paint almost to a wash as anything thicker will cover the natural grain in the wood. This made for a very rich dark wood tone. I don’t think I’ll use this on too many puppets, but it is a good color for brighter puppets or certain color schemes.
 On this base, I went with a much warmer light wash which I achieved by mixing Sepia Wash with Yellow Ink. Again, this is a good way to add some variety to the bases and matches the color scheme of the models and board very well.
The last combination I tried was a mix of Sepia Wash with a touch of Red Wash. Again, this helped add some variety to what will eventually become a large number of Puppet bases.
Varnishing the Bases
 I keep saying this, but the more I work with this basing technique, the more important varnishing in the right way at the right time has become. In general, I recommend hand painting a gloss varnish to the bases as soon as possible. The nature of the reaction between the balsa wood and the wash as it dries leaves a dull and muddled look. Even after all the work earlier to carve these bases, if the wash dries all the way, we are left with a bland base that shows little detail.
Even applying varnish after the base has dried will lose a great deal of detail. Below is a picture of one of my test bases. The bottom has been varnished high gloss after drying while the top has been varnished with a paint-on matte varnish after drying.

 By contrast, my completed bases were varnished immediately after they were stained. I let them sit just long enough that the stain doesn’t transfer to my fingers with a light touch. I used two heavy coats of painted high gloss varnish and this has seemed, at least over the last few weeks, to lock the color and detail in place.
So there they are. All that is left now is to build about 60 more bases and get those puppets done.
More to follow.
-Nick


Comments
Post a Comment