Malifaux Terrain: At Last

An exercise of that re-balancing has been for me to brainstorm about those things that I like to do, the things that define 'me' outside of my job. In terms of gaming, this means returning to what has always been my favorite aspect of the hobby; terrain. And so I've begun work on some new Malifaux terrain, my first terrain project in almost 10 years. Yikes!

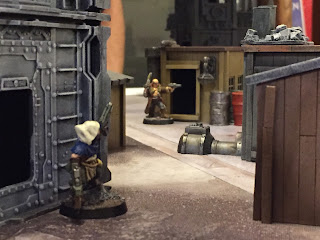
 My first dive into terrain again is some simple rocky outcroppings.
 I'm using these more as a proof on concept for the next phases of the project, which will be more 'badland' terrain, including hills, woods and a set of stone ruins (using the GW ruined temple kit).

 this type of terrain. However, I didn't think the dark greys that have always worked for 40k, Mordheim and Necromunda, fit the aesthetic I am looking for with Malifaux. To me, Malifaux is a metaphor for the expansion of America during the time period in which the game is set. It is the ultimate story of manifest destiny, here mankind, seeking freedom, power and riches, sets out into an unknown world determined to conquer it, no matter the opposition. This idea is one of the things that attracted me to the game in the first place.
 So for this project, I decided to go with that idea in mind and create something that looked very west/southwestern.
How about some notes on the construction?

The process is relatively straight forward. I collected these rocks from nearby railroad ballast, taking care to pick stoned that were particularly angular. These were simply mounted to MDF and the ground texture applied, first with a layer of fine sand and then with the large pebbles, which were collected from the shore of Lake Michigan and sifted into different sizes.

 When it came time to paint, I airbrushed everything black and began with a good coat of an equivalent of Vallejo Model Color Scorched Earth. For these terrain projects, I use FolkArt acryllic paints from craft stores as they come in a large variety of colors, are cheap, and are nice and thick, which helps for any drybrushing.
 I steadily went from the scorched brown up into beige tones, and for a moment I thought I would stop with rocks that were very red. I decided against this however, I continued to add honey colors and beige to the mix until I finally arrived at a layer I thought looked complete. for the sandy ground, I continued to highlight all the way up to something similar to Bleached Bone.
  After all the paint was dry, I went over the rocks and smaller stones with a variety of washes, including Sepia and Secret Weapon's Stone and Baby Poop. This was to call out the details in the rock more after painting, but it also has the nice affect of adding some variation to the color of the rock. To finish the paint job, I went back with all the different colors I'd used for far, all the way back down to Scorched Brown, and stippled them here and there, again to add variation in the colors of the stone and sand.
 After a coat of varnish was dry, I then started with the foliage.
For the project, I used Lichen in two shades, four shades of static grass, some clump foliage and then some 'tall grass.' There's not all that much interesting about the foliage, aside from the fact that it looks great. My tip would be to mix up your static grass. I have found that, using only one blend of grass starts to look a bit fake, but mixing a spring blend with a dry grass blend give you some natural looking variation in the grass and just looks nicer.


 I think these pieced have done their job as a proof of concept for this style of board. Next up, we're going to start with some hills and woods using the same palette. The good news is that rock outcroppings, woods, hills and the ruins will all be made with exactly the same techniques. The only difference is how much of each material you use, and what you glue on top when it's done.
Thanks for taking the time. As always, comments are very welcome.
More to Come.
-Nick

Simply excellent!
ReplyDeleteThanks Phil! And thanks for taking the time to stop by and leave a comment!
ReplyDelete