Super Dungeon Explore Vol. 1: Painting has Begun
 |
| NOM NOM NOM! |
I managed to completely assemble SDE at about the same time I finalized all of my airbrush workings, so it was natural that I would try the brush out on undercoating some models.
As it turns out, it has been years since I painted anything assembly line. Using my old techniques, this process was enormously time consuming and difficult, as I would complete a basecoat on an entire squad of models and them move on to highlights. While I have managed to paint a large number of models over the years, this process would often result in entire suads of models left unfinished, or even worse (and more common), having a squad complete except for one model, inevitably left only primed as I grew bored with the base coat.
(This is kind of what happened with my Space Hulk Marines, for those of you who have read this blog for a long time.)
The other problem this causes is that you can easily loose track of the steps you took, and therefore never have a group that really looks like they've been painted together. Assembly line painting is now much easier, as I am working on one color at a time.
Kobold Knuckleheads
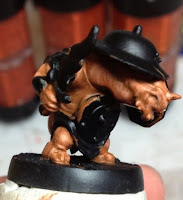
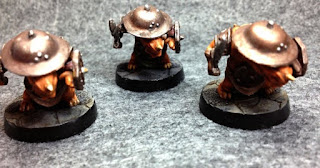
The Knuckleheads are the first group finished. I've been pondering over what my kobolds should look like for some time. I wanted them to look distinctly lizard, but was not a fan of the green schemes I've seen around. I also wanted them to stand out from their Dragon kin counterparts, who I imagine will be more conventional reds. I settled on an orange skintone as it still blends well with the rest of the fiery SDE denizens, but has a wide range. The orange-brown you see on these guys is the center of that range. Ironscales will be much more brown, while Dragon priests will be a much paler orange.
The SDE monsters are something of a tightrope walk for me. I want toget them all painted quickly, but I also want them to a high standard, so I am looking for schemes I can repeat easily and that will work with only a few highlights.
I started with basecoat of Beasty Brown. I did two layers of this as I had primed the models black (I am increasingly getting 'over' black undercoats). The first highlight was then applied as a 1:1 mix of Beasty Brown and Parasite Brown. I painted this into all but the recesses of the model. I then highlighted with Parasite Brown straight, and then did two smaller highlight layers, one of 3:1 Parasite Brown and Bleached Bone and another 1:1 mix of those same, just to pick out the highlights. Finally, I toned the whole thing down with a light wash 1:1:1 Sepia, Umber, water. I then went back with my Parasite Brown/Bleached Bone mix to make the highlights pop.
When it came to the armor, I wanted to stay away from a cloud of silver as these guys have a lot of metal on them. Practicing NMM, though I've seen it used to great effect on these models, is just something I have the time for right now, so I decided to to go for a much darker metallic look.
The armor was basecoated with a 1:1 mix of Tin Bitz and Scorched Earth. (I think vallejo calls a similar color Tinny Tin, but I've never much like Vallejo's Game Color metallics. The Vallejo Air are much better....though I'm not sure there is a suitable replacement for Tin Bitz....come to think of it...I've not even sure there's a GW equivalent....)
I followed that by adding a bit of Boltgun Metal (or whatever they call it now) to the mixture. This was important, as I didn't want the armor too brassy looking by highlighting with Tin Bitz straight. Instead, the metal looks old and worn. I did a couple of layers like this, adding a bit more silver as I went. As a final touch, I gave it a very thinned down wash of 2:2:1 water, black and umber washes. Once dry I went back and touched the armor up with a small boltgun highlight.
**To add a note here** One thing I've noticed when using Vallejo washes, in particular the more you thin them down. They have a tendency to dry with white patches right in some of the recesses. To date, I have been able to fix these simply by applying varnish, but just a heads up.
The only other thing about the kobolds worth mentioning if the scales on their backs. This was a basecoat of Graveyard Earth, which I then mixed with increasing amounts of Kommando Khaki (again, an old paint name...not sure what it is called now). Each highlight was painted on as individual lines onto the scales, to give them that reptilian look of scales always growing. Once everything was in place, I gave them a very thin wash with Sepia and a hint of yellow. Then I went back to the lines again until I was happy with the result.
Well, that ended up being quite a wall of text. More to come, obviously. Thanks all!
-Nick


I have a Super Dungeons Explorer set myself stored away for future painting. Looking forward to seeing your progress on the rest of the minis.
ReplyDeleteYour mini-tutorial is cool and it helps that I am using GW paints myself.
Your kobolds and chest look way cool by the way. =)
Thanks a lot, my friend. I've been having fun getting these guys painted. Hope to have more this week!
ReplyDelete